|
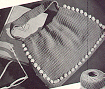
Crochet Purse Pattern
This crochet pattern is from the book "Smart
Bags", Crochet your Own Hats-Bags by Coats and Clark C. 1944, Book No. 209.
Town and Country Accessory
No. 2684
Materials: J&P Coats Crochet Cord, 8 balls of main color and 1 ball
of a contrasting color.
Steel Crochet Hook No. 1.
1/3 yard crinoline (pellon would work well to and is readily available
in fabric stores)
1/3 yard lining material
1 8-inch zipper
Guage: 6 sc make 1 inch; 6 rows make 1 inch.
Use
Double thread throughout.
Starting at bottom
with main color, make a chain about 15 inches long (5 ch sts to an inch).
Row 1: Sc in 2nd ch from hook and in each ch across until row measures 11 inches. Cut off remaining chain.
Ch 1, turn.
Row 2: Sc in each sc across. Ch 1, turn.
Repeat the 2nd row until piece measures 7 1/2" deep. Do not turn but work sc along 3 sides (remaining side is top of bag).
Fasten off.
With right side of last row facing, attach
a double strand of contrasting color to 3rd sc from top on 1 side, ch 1, 5 dc in same place, drop loop from hook, insert hook
in 1st dc of 5 dc group and draw dropped loop through (pc st is made), *ch 4, skip 3 sc, 5 dc in next sc and complete pc st
as before. Repeat from * across 3 sides, ending to correspond with beginning. Fasten off.
Attach main color to first st on same side where pc sts started, sc in same place and in next sc, * skip
pc st and, working over ch 4 in order to conceal it, sc in next sc, 2 sc in next sc, sc in next sc. Repeat from * across 3
sides. Fasten off. Make another piece same as this.
Gusset
Starting at one end, ch 9.
Row 1: Sc in 2nd ch from hook and in each remaining ch. Ch 1, turn.
Row 2: Sc in each sc across. Ch 1, turn. Repeat the 2nd row until piece measures 28 inches long. Fasten
off.
Handle
Work as for gusset for 14 inches. Fasten off.
Make a paper pattern for each crocheted piece and lay aside to be used later. Join gusset to sides and bottom of one
crocheted piece by working a row fo sc over both thicknesses. Join remaining side of gusset to other crocheted piece in same
way. Fasten off.
Make 5 pleats on both sides along
top of bag so that top measures 8 inches across, excluding gussets.
Lining Instructions for crochet bags and purses.
These instructions will make a lining that is removable and makes the purse easily washable.
1. Make a paper pattern of the pieces of the crocheted purse, making them slightly smaller so that
the lining will fit in the purse. Insert piece (or pieces) of paper pattern into crocheted bag and trim pattern
if necessary to correspond in size and shape. Note: It is important that the pattern be slightly smaller than the corresponding
crocheted piece.
2. (a) Cut lining material exactly
like piece (or pieces) of paper pattern.
(b)
cut crinoline (or pellon) in exact shape of paper pattern but a generous 1/4" smaller all around.
3. (a) Place crinoline over lining material, turn edges about
3/8 inch over crinoline all around and pin, so that the lining is taut and crinoline cups slightly. Sew edges of lining to
crinoline with over-and-over stitches, being careful not have stitches show on right side. The lined side of crinoline is
the lining of your bag.
(To prevent transparency in a
bag made of motifs or lacy texture...line the other side of crinoline, sewing sith slip stitches along edges and keeping curve
of crinoline.)
(b) Assemble
the piece (or pieces) of lined crinoline by sewing with small over-and-over stitches. Your bag form is now completed.
4. Where a zipper is specified, pin the tape in place to outer side of
bag form (thus zipper will come between bag form and crochet). Sew firmly.
5. Insert bag form into crocheted bag and slip stitch along edges.
|